

Ubuntu Livepatch is a feature that applies kernel security fixes while the system is still running, so you do not need to reboot immediately after every kernel update.
Ubuntu Livepatch is useful mainly on servers, where rebooting is not always convenient because it can interrupt services, disconnect users, or require a maintenance window. Livepatch reduces the gap between a security fix being released and it actually protecting the running system.
The Linux kernel sits at the core of the system and is a frequent target for security issues, because when Canonical releases a kernel update, you would normally install it and then reboot to start using the fixed kernel, but until that reboot happens, the system is still running the older, vulnerable kernel.
Livepatch changes that behavior, it injects certain kernel fixes into memory while the system is running, which means some critical security issues can be fixed without waiting for a reboot.
On Ubuntu desktop systems, this is usually not necessary because rebooting after updates is common and not very disruptive, but on Ubuntu servers, where uptime is more important, and restarts are planned, Livepatch helps reduce the time a system stays exposed after a kernel CVE fix is released.
In this guide, we’ll explain what Ubuntu Livepatch is, how to enable it on Ubuntu 26.04, and how to verify it’s patching your kernel without a reboot.
What Is Ubuntu Livepatch
Ubuntu Livepatch is included with the Ubuntu Pro subscription, which Canonical also offers free for personal use on up to 5 machines.
It focuses on fixing critical and high-severity kernel security issues while the system is running. Instead of waiting for a reboot after a kernel update, the patch is applied directly to the active kernel in memory, which keeps the system running normally, but the vulnerable code path gets replaced with the fixed version.
Livepatch is not a replacement for regular kernel updates; it only covers selected security fixes for the currently running kernel, full kernel upgrades still matter because they bring new features, hardware support, and broader fixes, which still require a reboot to take effect.
When you eventually reboot during a planned maintenance window, the system boots into the updated kernel version from disk. After that, Livepatch continues working on top of the new kernel, applying future critical fixes in the same way.
In short, kernel updates still happen as usual, but Livepatch reduces the time your system sits exposed between a security fix being released and a reboot being done.
If this gave you a clearer picture of what Livepatch actually does, who’s been putting off that kernel patch conversation.
Step 1: Attach Your System to Ubuntu Pro
Before Livepatch can be used, the system needs to be attached to an Ubuntu Pro account, Canonical provides a free personal subscription that works on up to 5 machines.
Go to Ubuntu Pro, sign in, and copy your token from the dashboard.
Now attach the system using that token:
sudo pro attach your-ubuntu-pro-token
After running it, you will see output similar to this:

This table shows what your subscription includes, at this point, Livepatch is listed but still not active, that is normal because attaching the machine only connects it to Ubuntu Pro, it does not turn on individual services yet.
If something goes wrong:
- If you see Invalid token, the token is usually copied incorrectly.
- If you see This machine is already attached, the system is already linked to another account.
You can reset it with:
sudo pro detach
Then run the attach command again with the correct token.
Step 2: Enable Livepatch
After the system is attached to Ubuntu Pro, turning on Livepatch is done with a single command:
sudo pro enable livepatch

Once this finishes, Ubuntu Livepatch is active on the system.
Behind the scenes, this step installs the canonical-livepatch snap and starts its background service, which connects to Canonical’s Livepatch servers and checks whether there are any available kernel patches for your currently running kernel.
From this point on, the system will automatically pull in supported kernel security fixes without needing a reboot.
You can confirm that everything is running with:
sudo canonical-livepatch status

If it is working correctly, you should see a status like running along with information about your current kernel and applied patches.
If this saved you 20 minutes of digging through Ubuntu Pro docs, who manages Ubuntu servers without a proper patching schedule.
Step 3: Check Livepatch Status
Run the status command to confirm the service is running and to see what has been applied so far:
sudo canonical-livepatch status --verbose
You will see output similar to:
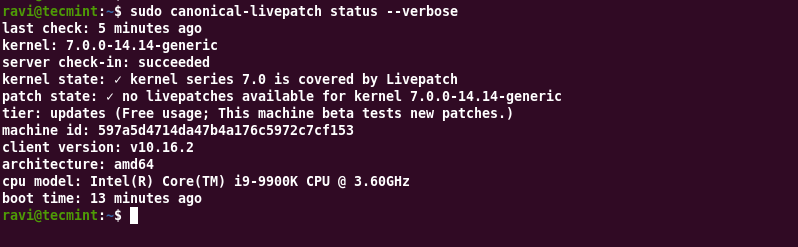
The most important line here is: patch state
- If it shows
nothing to apply, your system is already on the latest available kernel security fixes for your current kernel version. - If patches are available and already applied, you will see something like
applied: N patches, that means Livepatch has already injected fixes into the running kernel. - The
kernelline tells you exactly which kernel is currently being protected, this is useful when you want to confirm you are not running an older kernel by mistake. - The
tier: updatesline means you are receiving patches as soon as Canonical releases them for Livepatch users, some systems may show a different tier depending on subscription or rollout timing.
If the output shows something like daemon not running, the Livepatch service is not active.
In that case, restart it:
sudo snap restart canonical-livepatch
Then run the status command again:
sudo canonical-livepatch status --verbose
Once it comes back as server check-in: succeeded, the system is properly connected and checking for kernel patches again.
Step 4: Verify the Service Is Running
Ubuntu Livepatch runs as a snap service, you can confirm its status at the system level using:
sudo snap services canonical-livepatch
You should see output similar to:
Service                                   Startup  Current  Notes
canonical-livepatch.canonical-livepatchd  enabled  active   -
Here’s what each part means in plain terms:
- enabled means the service will start automatically when the system boots
- active means it is running right now
- inactive means it is installed but not currently running
If the service is not running, you can start it manually:
sudo snap start canonical-livepatch
After starting it, you can confirm again:
sudo snap services canonical-livepatch
Once it shows active, the Livepatch service is running normally and ready to apply kernel security fixes as they become available through Ubuntu Pro.
Step 5: Enable Livepatch at Boot (If Needed)
On most systems, Ubuntu Livepatch starts automatically after installation, because snap service is already configured to run on boot.
If it was disabled earlier for any reason, you can turn it back on with:
sudo snap set canonical-livepatch enabled=true
To confirm the change, check the service again:
sudo snap services canonical-livepatch
You should now see:
Service                                   Startup  Current  Notes
canonical-livepatch.canonical-livepatchd  enabled  active   -
If Startup shows enabled, the service will start automatically after every reboot. This keeps Ubuntu Pro Livepatch running without needing manual intervention after system restarts.
How to Disable Livepatch
If you need to turn off Ubuntu Livepatch, you can do it with a single command:
sudo pro disable livepatch
You will see output like:
Removing canonical-livepatch snap
Livepatch disabled
This removes the canonical-livepatch snap and stops the background service, the system will no longer receive live kernel patches after this point.
Your machine is still attached to Ubuntu Pro, so other services like security updates for packages remain active. Only Livepatch is turned off.
If you want to turn it back on later, just run:
sudo pro enable livepatch
That will reinstall the snap, start the service again, and resume live kernel patching for supported kernels.
If your team runs Ubuntu in production and nobody has set this up yet, right now.
Checking Which CVEs Are Patched
Ubuntu Livepatch also provides a way to see exactly what security fixes have been applied to your running kernel, including CVE details.
You can get this information in a structured format using JSON output:
sudo canonical-livepatch status --format json | python3 -m json.tool
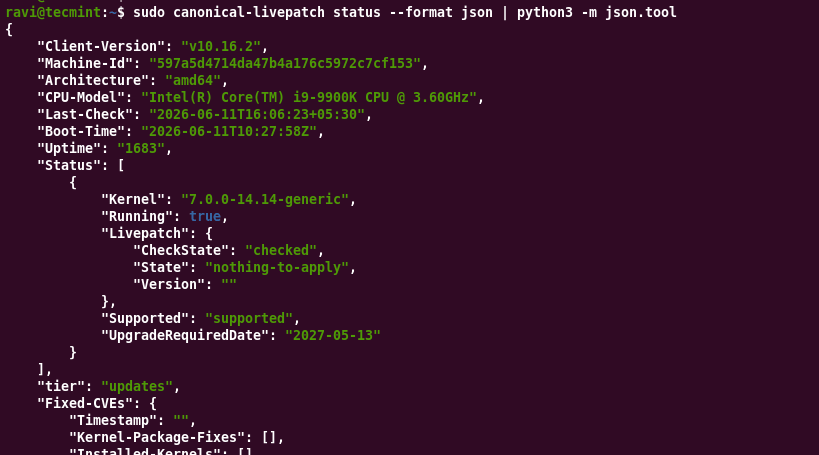
The key part is the patches section, where each entry lists the patch ID and the CVE it fixes. If applied is true, that fix is already active in the running kernel.
This is the output you can share with audits or security reviews when someone asks whether a specific kernel CVE is covered without rebooting.
A few fields that are useful to read:
- patchState: shows whether patches are applied or if there is nothing pending
- kernel: confirms the exact running kernel version
- patches: lists each applied fix with CVE IDs
- applied: tells whether that patch is active in memory
Ubuntu Pro users get access to this visibility as part of the Livepatch service, so you can verify kernel security status without relying only on package versions or reboot state.
Conclusion
Ubuntu Livepatch is now running on your Ubuntu 26.04 system, connected through Ubuntu Pro, and handling kernel security fixes without waiting for a reboot.
Once everything is set up, there is not much day-to-day work needed. The service checks in with Canonical, applies supported kernel fixes in memory, and keeps track of what has been applied.
Most of the time, you will not notice anything happening in the background. That is normal. The goal is simply to reduce the gap between a kernel security fix being released and it actually protecting your running system.
Have you run into any CVEs that Livepatch covered before you had a chance to schedule a reboot window? Drop your experience in the comments, I read every one.
If this article helped, with someone on your team.