

Rocky Linux 10 replaced VNC with RDP (Remote Desktop Protocol) for remote graphical installations, so if you’ve got a headless server and no monitor to plug in, this guide shows you exactly how to run the full Anaconda installer from your workstation using 3 boot parameters.
Most real servers don’t have a monitor attached and sit in a rack, where they are powered on and managed entirely over the network from a remote system.
That works fine after the system is installed because you can manage it over SSH, but the initial OS installation is different, especially when a graphical installer is involved, since you normally need a screen.
Rocky Linux 10 solves this with a boot option called inst.rdp, which lets you start the installation without a physical monitor by passing a few parameters at boot.
During installation, the Anaconda installer starts an RDP server on port 3389, allowing you to connect from your laptop or workstation with any standard RDP client and view the full graphical installer in an RDP window as if you were sitting in front of the machine.
This method has been tested on Rocky Linux 10 (x86_64) and should also work on RHEL-based distributions such as RHEL 10 and AlmaLinux 10, since they use the same Anaconda installer.
What You Need Before Starting
Before you begin, make sure you have the following:
- A Rocky Linux 10 DVD ISO written to a USB drive.
- A network connection between the target server and your workstation.
- An RDP client on your workstation:
- Linux: Remmina or GNOME Connections.
- Windows: Remote Desktop Connection (built in).
- macOS: Microsoft Remote Desktop.
- Physical or out-of-band access to the server so you can edit the boot menu once.
To enable RDP installation, you’ll need to interrupt the normal boot process and add a few kernel parameters from the GRUB boot menu. That means you must be able to interact with the server during startup.
If the server is sitting next to you, simply connect a keyboard and monitor and edit the boot entry directly, but if the server is located in a remote data center, you’ll need some form of remote console access.
Most enterprise servers provide this through out-of-band management tools such as Dell iDRAC, HPE iLO, or Supermicro IPMI. These tools let you view the server’s screen and control the keyboard remotely, even before the operating system is installed.
The good news is that this is the only time you’ll need console access. Once you’ve added the required boot parameters and started the installer, Anaconda launches its RDP service and you can complete the entire installation from your workstation over the network.
Step 1: Boot the Rocky Linux 10 Installer Media
Insert the Rocky Linux 10 USB drive, power on the server, and select the USB device from the boot menu. The key used to open the boot menu varies by hardware vendor, but it’s commonly F11, F12, or Esc.
When the Rocky Linux boot screen appears, don’t start the installer yet, just press e to edit the selected boot entry, which opens the GRUB boot editor, where you can modify the kernel command line before the system boots.
Look for the following line on UEFI systems.
linuxefi
on legacy BIOS systems.
linux
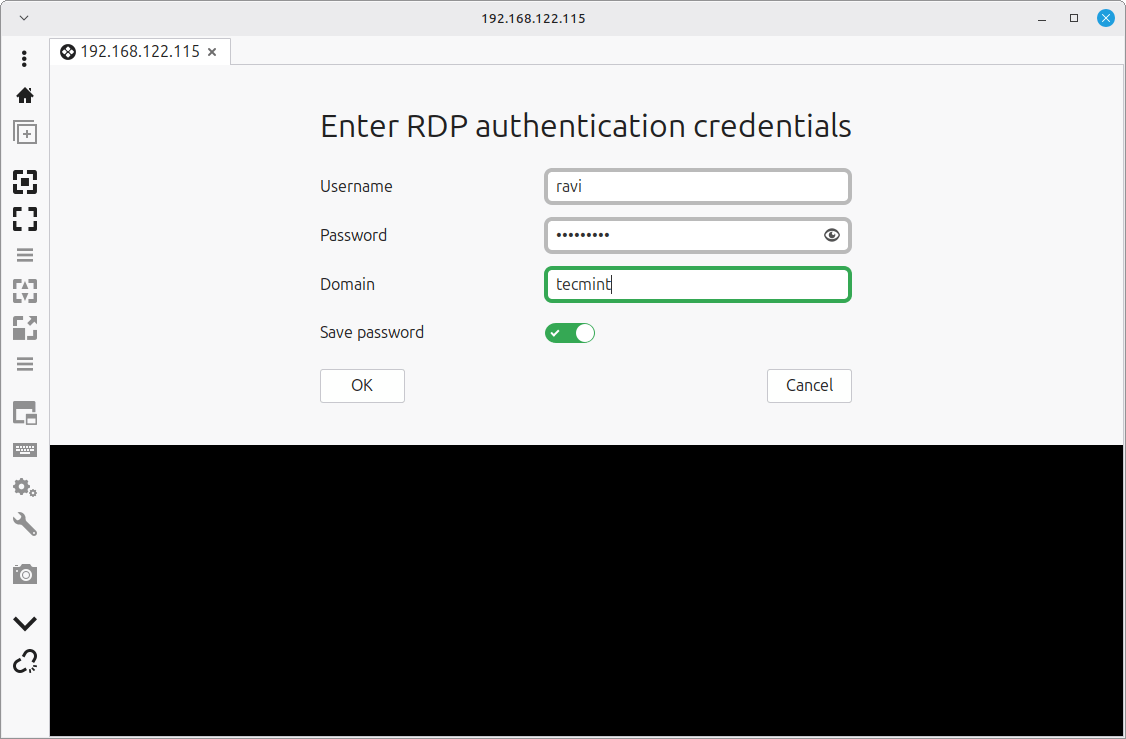
Using the arrow keys, move the cursor to the end of that line and append the following parameters, replacing the example username and password with your own values:
inst.rdp inst.rdp.username=rdpuser inst.rdp.password=SecurePass123
The complete line will look similar to this:
linuxefi /images/pxeboot/vmlinuz inst.stage2=hd:LABEL=Rocky-10-2-x86_64-dvd ro inst.rdp inst.rdp.username=ravi inst.rdp.password=rigec123
Here’s what each parameter does:
- inst.rdp – Tells Anaconda to start an RDP server and wait for a client connection instead of using a local display.
- inst.rdp.username=
– Sets the username you’ll use to log in to the RDP session. - inst.rdp.password=
– Sets the password for the RDP session.
The credentials specified here exist only for the installer session. They are not copied to the installed operating system and have no effect after installation completes.
If you omit the username and password options, Anaconda will still start the RDP service. However, you’ll need to create the credentials interactively from the server console before any remote client can connect, which defeats much of the convenience of a fully remote installation.
After adding the parameters, press Ctrl+X or F10 to continue booting with the modified configuration.
If this is saving you a trip to the data center, who manages headless servers too.
Step 2: Wait for the RDP Server to Start
After the system boots, the Anaconda installer begins loading and depending on your hardware, this usually takes anywhere from 30 seconds to a couple of minutes.
During startup, keep an eye on the console messages. Once Anaconda has initialized the network and started the RDP service, you’ll see a message similar to the following:
This message confirms that the installer is ready and waiting for an RDP connection, so make a note of the IP address shown on the screen. You’ll need it in the next step when connecting from your workstation.
In this example:
- IP Address: 192.168.122.115
- Port: 3389 (the default RDP port)
The full connection target would therefore be:
192.168.122.115:3389
If you see an IPv6 address in brackets like [2001:db8::1]:3389, your server got an IPv6 lease. Most RDP clients handle IPv6 fine. If yours doesn’t connect using the IPv6 address, check your router or DHCP server and see if the server also got an IPv4 address assigned.
If you see Permission denied or the RDP server message never appears, double-check that you typed inst.rdp correctly in the boot editor. A typo there means Anaconda falls back to text mode and skips RDP entirely.
Step 3: Connect to the Installer with RDP
Once Anaconda displays the connection information, switch to your workstation and open your preferred RDP client and connect to the IP address shown by the installer using port 3389. When prompted, enter the username and password you specified in the boot parameters.
Using Remmina on Linux
If you’re using Linux, Remmina is one of the easiest RDP clients to use directly from a terminal:
remmina -c rdp://192.168.122.115
If Remmina isn’t already installed, install it using your distribution’s package manager:
sudo dnf install remmina        # On Fedora/RHEL/Rocky
sudo apt install remmina        # On Ubuntu/Debian
After connecting, enter the RDP username and password you configured in Step 1.
If your desktop environment includes GNOME Connections, open it, click the + button, choose RDP, enter the server IP as the host, and click Connect.
Using Remote Desktop Connection on Windows
Press Win+R, type mstsc, and press Enter. In the Computer field, enter 192.168.122.115, click Connect, and enter your credentials when prompted.
Using Microsoft Remote Desktop on macOS
Download Microsoft Remote Desktop from the Mac App Store, click Add PC, enter the server IP, and connect.
If everything is working correctly, a new RDP window opens and displays the familiar Anaconda graphical installer.
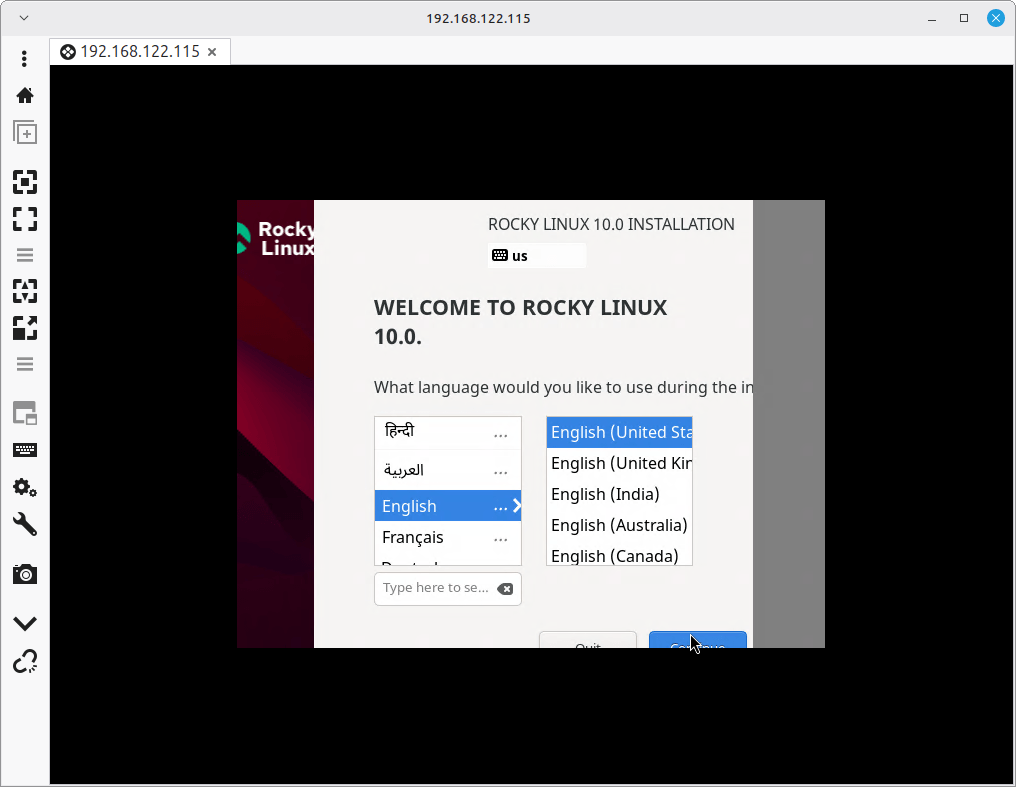
At this point, you’re effectively sitting in front of the server, even though you’re connected remotely. You can use the installer exactly as you would if a monitor, keyboard, and mouse were attached locally.
Got this connected on the first try? who’s been putting off that headless server setup.
Step 4: Complete the Installation in Anaconda
Once connected over RDP, you’ll see the familiar Anaconda graphical installer, with the main screen is called Installation Summary, and it’s where you configure everything before Rocky Linux is installed.
One important thing to know is that nothing is written to disk until you click Begin Installation, so feel free to move between sections and review your settings before committing any changes.
A good approach is to work through the sections from top to bottom.
Localization
Start with the localization settings:
- Keyboard
- Language Support
- Time & Date
For most English-speaking users, the default selections are already correct. If you’re installing a server in a different region or need additional keyboard layouts, make those changes here.
Software Selection
Next, open Software Selection, which determines which packages and system roles will be installed.
For most servers, choose:
- Minimal Install – A lightweight command-line system with only the essential components.
If you want a graphical desktop after installation, choose:
- Server with GUI – Includes a desktop environment and graphical management tools.
Remember that this choice only affects the installed operating system. The RDP session you’re currently using is provided by the installer itself and will disappear when installation is complete.
Installation Destination
Open Installation Destination and select the disk where Rocky Linux will be installed. For most deployments, the default Automatic storage configuration is perfectly adequate.
Anaconda automatically creates the partitions required for the system to boot:
- On UEFI systems, an EFI System Partition (ESP).
- On BIOS systems, a small BIOS Boot partition for GRUB.
You’ll see these partitions listed in the storage summary. They are required and normally don’t need any manual changes.
If your environment requires a custom layout, such as:
- Separate
/homeor/varpartitions - LVM volume groups
- Software RAID
- Multiple disks
select Custom and configure the storage layout manually.
Network & Hostname
Open Network & Hostname next, here you can:
- Set the hostname for the installed server.
- Verify that the network interface is enabled.
For example:
web01.tecmint.com
The installer is already using the network connection that enabled your RDP session, but it’s still worth confirming the correct interface is active and configured as expected.
User Settings
Open User Creation and enter your:
- Full name (optional)
- Username
- Password
Then make sure to enable: Make this user administrator, which adds the user to the wheel group, which grants access to the sudo command.
Using sudo allows a regular user account to perform administrative tasks without logging in directly as root.
Start the Installation
Once every required section shows a green checkmark, the Begin Installation button becomes available at the bottom of the screen.
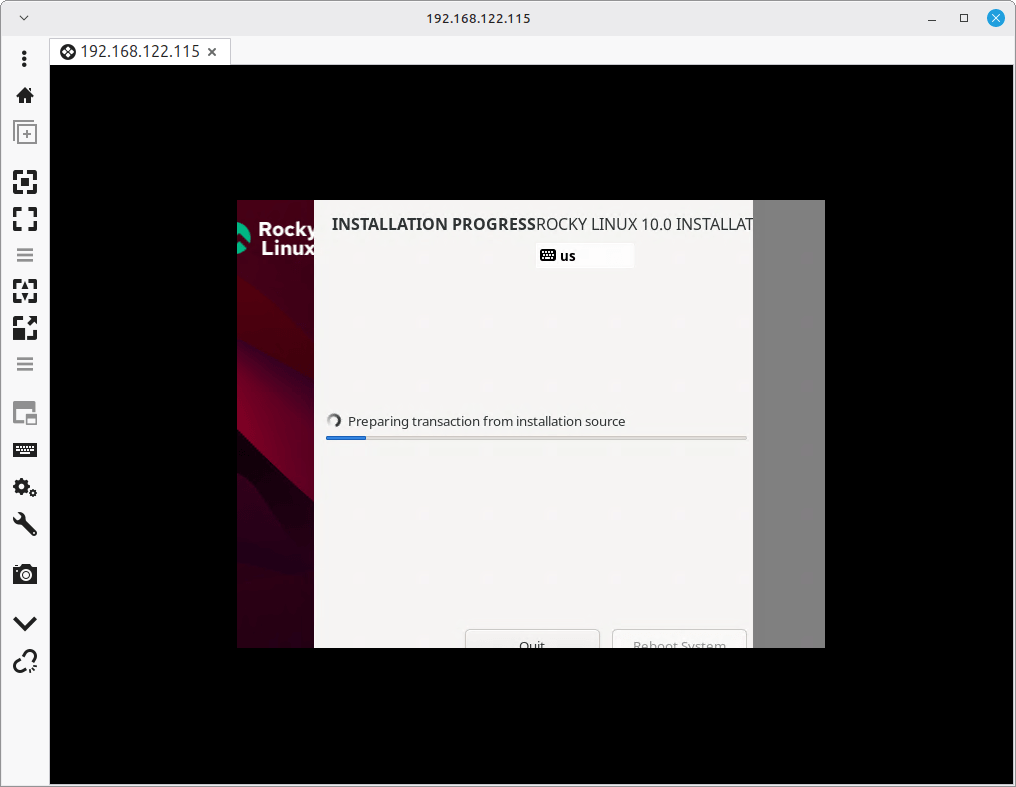
Take a final look at your settings and click Begin Installation. At that point, Anaconda starts partitioning disks, copying packages, and configuring the system. The installation usually takes several minutes, depending on your hardware and the software profile you selected.
Got your installer running in an RDP window? – it’s the kind of thing everyone needs once, and nobody remembers how to do.
Step 5: Wait for Installation to Finish
After you click Begin Installation, Anaconda starts preparing the system, and during this phase, it will:
- Create and format partitions
- Install packages
- Configure users and groups
- Set up the bootloader
- Apply your selected system settings
Your RDP session remains connected throughout the process, so you can monitor progress from your workstation just as if you were sitting in front of the server.
Installation time depends largely on the storage hardware and software profile you’ve chosen:
- NVMe SSD: typically 5 to 10 minutes
- SATA SSD: typically 10 to 15 minutes
- Traditional hard drive: often 20 to 30 minutes or longer
When installation finishes, Anaconda displays a Reboot System button, just click it to restart the server.
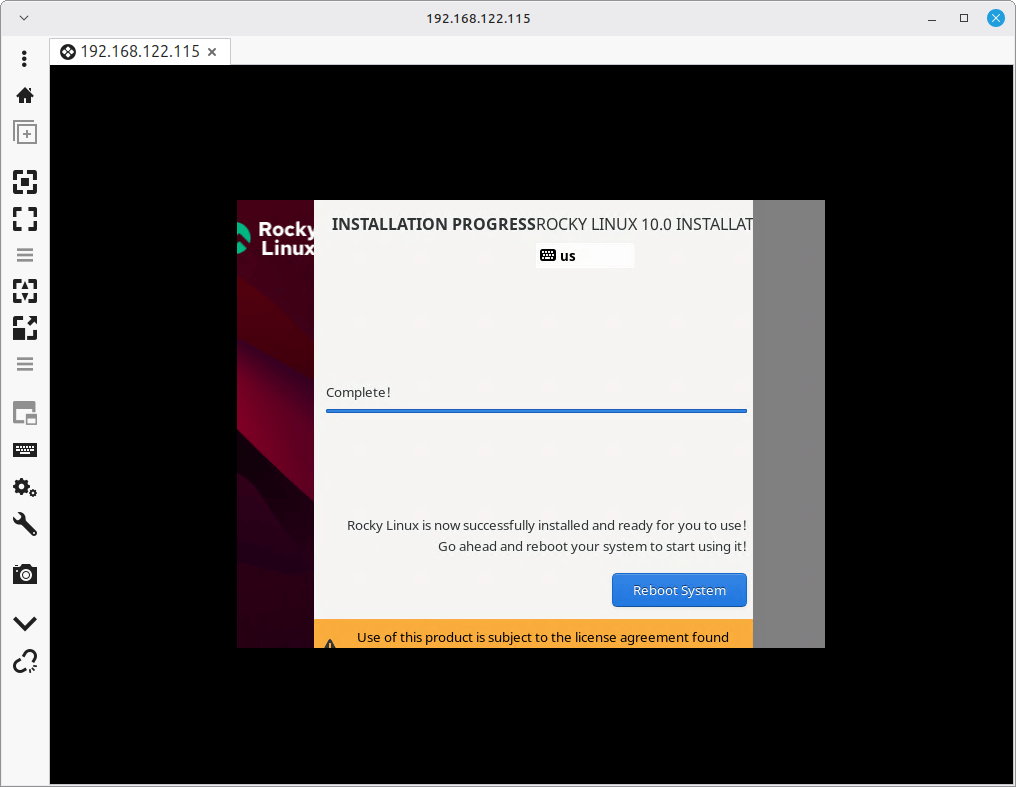
As soon as the reboot begins, the temporary RDP service provided by the installer shuts down, and your RDP session will disconnect automatically, which is completely normal.
At this point, the installer’s job is finished.
Step 6: Log In Using SSH
Once the system has restarted, connect to it using the administrative account you created during installation.
From your workstation, run:
ssh [email protected]
The first time you connect, SSH will ask you to verify the server’s host key and enter your password, you’ll see a prompt similar to.

Once SSH accepts connections and you reach the shell prompt, the installation is complete, and the server is ready for normal administration.
At this point, you can disconnect the installation media, begin applying updates, install additional software, and continue configuring the system just like any other Rocky Linux server.
Conclusion
Installing Rocky Linux 10 on a headless server is surprisingly straightforward. With just a few boot parameters and a standard RDP client, you can access the full Anaconda graphical installer without needing a monitor, keyboard, or KVM connected to the machine.
If this is your first time using inst.rdp, it’s worth testing the process on a virtual machine or spare system before deploying it on production hardware. The only part that typically trips people up is editing the GRUB boot entry. A small typo in the kernel parameters can prevent the RDP service from starting, so it’s helpful to become familiar with that step in a safe environment first.
Once you’ve done it once, though, remote installations become quick and painless, making inst.rdp a useful tool for managing servers in racks, remote offices, labs, and data centers.
Have a question about the installation process, storage configuration, networking, or a specific error message? Leave a comment below, and we’ll do our best to help.
If this article helped, with someone on your team.