

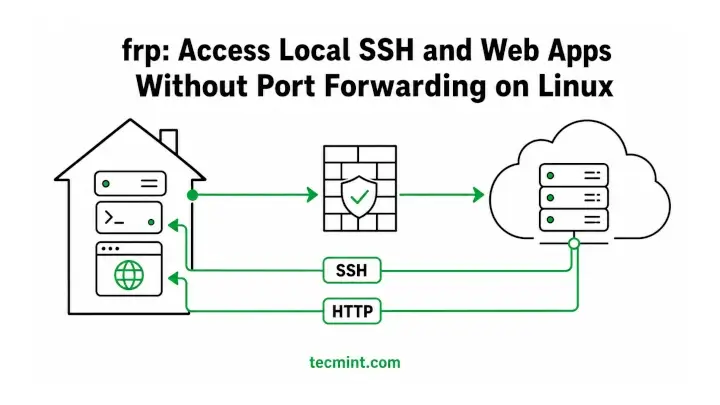
Your home server has no public IP. Your ISP has assigned you a CGNAT address, so port forwarding on the router does nothing. Most guides also assume you control the edge of your own network.
frp solves this by reversing the connection direction: your local machine connects out to a public server, and the tunnel it creates carries traffic back in.
This guide was tested on Ubuntu 26.04 and Rocky Linux 10 with frp 0.71.0, but the commands work on any modern Linux distribution.
How frp Actually Works
frp comes with two binaries. frps is the server and runs on a machine with a public IP. frpc is the client and runs on the machine behind NAT.
frpc creates an outbound TCP connection to frps on a control port, usually 7000. Outbound connections can pass through NAT and most firewalls without any special configuration; that’s what makes frp work even when port forwarding isn’t possible.
Once the control connection is established, frps listens on the public ports you configured and sends incoming traffic through the tunnel to frpc. Your local service never connects directly to the internet; it only communicates with frpc on the local machine.
If the NAT and CGNAT explanation finally made this click for you, share it with someone who’s still fighting with their router’s port forwarding page.
Install frp on Both Machines
frp isn’t included in the default Ubuntu or Rocky Linux repositories, so download the release tarball from the official GitHub releases page. You’ll use the same download on both machines because the tarball contains both frps and frpc.
wget https://github.com/fatedier/frp/releases/download/v0.71.0/frp_0.71.0_linux_amd64.tar.gz
tar -xzf frp_0.71.0_linux_amd64.tar.gz
cd frp_0.71.0_linux_amd64
Here’s what each part of the tar command does:
tarreads and extracts the archive.-xextracts the files instead of creating an archive.-zdecompresses the gzip layer first.-ftellstarthat the next argument is the filename.
Now copy the binaries to a location that’s in the system path and create a directory for the frp configuration files:
sudo cp frps frpc /usr/local/bin/
sudo mkdir -p /etc/frp
The sudo prefix runs the command with root privileges. You need it because /usr/local/bin and /etc aren’t normally writable by a regular user. Without sudo, the copy command will fail with a Permission denied error.
Configure frps on the Public Server
frp supports TOML, YAML, and JSON configuration files. The older frps.ini format with a [common] section was deprecated in v0.52.0 and no longer receives new features, so use TOML for new setups.
Create the server configuration on the public machine:
sudo nano /etc/frp/frps.toml
bindPort = 7000

auth.method = "token"
auth.token = ""

webServer.addr = "0.0.0.0"
webServer.port = 7500
webServer.user = "admin"
webServer.password = ""
Anything inside angle brackets is a placeholder that you need to replace with your own value, without keeping the brackets. Generate the token with openssl rand -hex 24. The frpc configuration must use the exact same token; otherwise, the client will be rejected during authentication.
bindPort is the port where frpc connects to the server and carries the frp control connection. The dashboard on port 7500 is optional, but useful for checking connected clients and viewing per-proxy traffic counters.
Run frps as a systemd Service
Running frps directly in a terminal is useful for a quick test, but the process will stop when your SSH session ends. A systemd service keeps it running in the background and can automatically restart it if it fails.
Create the service file:
sudo nano /etc/systemd/system/frps.service
[Unit]
Description=frp reverse proxy server
After=network-online.target
Wants=network-online.target

[Service]
Type=simple
Restart=on-failure
RestartSec=5s
ExecStart=/usr/local/bin/frps -c /etc/frp/frps.toml

[Install]
WantedBy=multi-user.target
Reload systemd so it picks up the new unit, then start and enable it in one step:
sudo systemctl daemon-reload
sudo systemctl enable --now frps
sudo journalctl -u frps -n 20
You should see output similar to:
2026-08-19 10:12:03.114 [I] [frps/root.go:105] frps uses config file: /etc/frp/frps.toml
2026-08-19 10:12:03.115 [I] [server/service.go:238] frps tcp listen on 0.0.0.0:7000
2026-08-19 10:12:03.116 [I] [frps/root.go:114] frps started successfully
The frps tcp listen on 0.0.0.0:7000 message followed by frps started successfully confirms that the server is running and ready for connections. The log will normally stay quiet until a client connects.
Open the Ports on the Public Server
frps is listening, but the host firewall may still block incoming connections. You need to allow port 7000 for the control connection, along with every remote port you plan to expose.
On Ubuntu/Debian:
sudo ufw allow 7000/tcp
sudo ufw allow 6000/tcp
sudo ufw reload
On RHEL/Rocky Linux:
sudo firewall-cmd --permanent --add-port=7000/tcp
sudo firewall-cmd --permanent --add-port=6000/tcp
sudo firewall-cmd --reload
If you’re using a cloud VPS, the host firewall is only part of the setup. DigitalOcean, AWS, and Oracle Cloud can have a separate security group or cloud firewall in front of the instance.
That firewall must also allow the same ports, or the connection will be blocked before it reaches UFW or firewalld. For more firewall rule examples, see our guide on setting up UFW.
If the cloud firewall gotcha just saved you an hour of debugging, pass it along to the next person setting up their first VPS.
Configure frpc and Expose SSH
Now move to the machine behind NAT. This configuration points to the public server and creates a single proxy that maps local port 22 to port 6000 on the public server.
sudo nano /etc/frp/frpc.toml
serverAddr = ""
serverPort = 7000

auth.method = "token"
auth.token = ""

[[proxies]]
name = "ssh"
type = "tcp"
localIP = "127.0.0.1"
localPort = 22
remotePort = 6000
The [[proxies]] double brackets are TOML’s array-of-tables syntax. Repeat the entire block for every service you want to expose. Each proxy needs a unique name so frps can track it in the dashboard and logs.
Create a matching frpc.service unit with ExecStart=/usr/local/bin/frpc -c /etc/frp/frpc.toml, then start the service and watch the logs:
sudo systemctl daemon-reload
sudo systemctl enable --now frpc
sudo journalctl -u frpc -f
2026-08-19 10:14:41.902 [I] [client/service.go:295] try to connect to server...
2026-08-19 10:14:41.955 [I] [client/service.go:287] [8f2c1d9e2b7a4c31] login to server success
2026-08-19 10:14:41.956 [I] [proxy/manager.go:173] [8f2c1d9e2b7a4c31] proxy added: [ssh]
2026-08-19 10:14:42.011 [I] [client/control.go:172] [ssh] start proxy success
Read these four lines from top to bottom as a checklist. login to server success means the token was accepted, while start proxy success means frps successfully claimed port 6000.
If you see the second line but not the fourth, the tunnel is connected, but the port could not be claimed. A port conflict on the public server is a common cause.
Now test the tunnel from another machine:
ssh -p 6000 @
You’re connecting to the public server’s IP on port 6000, and frps sends that SSH session through the tunnel to port 22 on your home machine. The public server doesn’t authenticate the SSH session; it simply forwards the traffic, while your local sshd handles the actual authentication and access control.
Expose a Local Web App on a Real Domain
TCP proxies work, but they leave you sharing URLs like ip:port. frp’s HTTP proxy type routes requests by hostname instead, so multiple sites can share port 80 on the same server.
Add the virtual host port to frps.toml on the public server and restart frps:
bindPort = 7000
vhostHTTPPort = 80
Then add a second proxy block to frpc.toml on the local machine:
[[proxies]]
name = "web"
type = "http"
localIP = "127.0.0.1"
localPort = 3000
customDomains = ["app.example.com"]
hostHeaderRewrite = "127.0.0.1"
hostHeaderRewrite is useful when your local application doesn’t accept the original hostname. By default, the application receives Host: app.example.com. Some development servers reject hostnames they haven’t been configured to accept. Rewriting the header to 127.0.0.1 avoids that problem.
Point an A record for app.example.com to the public server’s IP, restart frpc, and open the domain in your browser. The request reaches port 80 on the public server, frps matches the Host header against customDomains, and then sends the request through the tunnel to your local application.
If the hostHeaderRewrite explanation helped fix a bug you’ve been chasing, share this with the developer on your team who keeps running into blocked-host errors.
Lock Down What Clients Can Ask For
By default, an authenticated frp client can request ports from the server, which can become a problem when multiple people use the same server. Two settings in frps.toml help restrict what clients can do:
allowPorts = [
  { start = 6000, end = 6100 }
]

transport.tls.force = true
allowPorts rejects any remotePort outside the allowed range, so a client can’t claim ports such as 22 or 443.
transport.tls.force makes frps reject plaintext control connections. Since modern frp clients already use TLS for the control connection by default, enabling this setting provides an extra layer of protection without requiring changes to the client configuration.
Common frp Errors and What They Mean
The error messages are easier to understand once you know what they point to:
login to server failedin thefrpclog usually means the tokens don’t match. Compareauth.tokenon both sides character by character, including any trailing whitespace.- A connection timeout on port
7000usually means a firewall or cloud security group is blocking the connection, not thatfrpsis down. - A
start proxyerror that names a port usually means eitherallowPortsdoesn’t include that port or another process is already using it on the server. Runsudo ss -tlnp | grep 6000on the public server to see which process has it open. - Antivirus software on Windows clients may sometimes quarantine
frpcas malware because reverse proxies can look like tunneling tools to security scanners. Thefrpmaintainers document this behavior, and adding an appropriate exclusion resolves it.
If this got your tunnel working on the first try, share it with someone who’s about to go down the same rabbit hole.
Conclusion
You now have frp set up with frps running on a public server with token authentication and a restricted port range, while frpc runs behind NAT as a systemd service.
You also have two working frp proxies: raw TCP for SSH and hostname-based HTTP for a web app. The same pattern works for other local services, since each new service is another [[proxies]] block followed by a restart.
Try adding an stcp proxy next. It works like a TCP proxy, but visitors need the preshared secretKey, so the port never becomes publicly accessible. That makes it a better choice for services you don’t want exposed to everyone on the internet.
What are you exposing with frp, and did you run into anything the docs didn’t cover? Drop it in the comments below, and I’ll dig into it.
If this article helped, with someone on your team.
