
Learn how to install safe-agentic-workflow (SAW) on Linux, add it to a project alongside Claude Code, and use it to process a real task through its multi-agent workflow with Node.js and Git.
If you ask Claude Code to fix a single bug, it will usually do a good job. But as projects grow and you start handling multiple bugs across different files over several days, things can become inconsistent.
One agent might skip running tests, another might make changes you didn’t ask for, and it can be difficult to track who approved what. SAW is designed to solve these problems by adding a clear, structured workflow instead of relying on increasingly complex prompts.
What SAW Actually Is
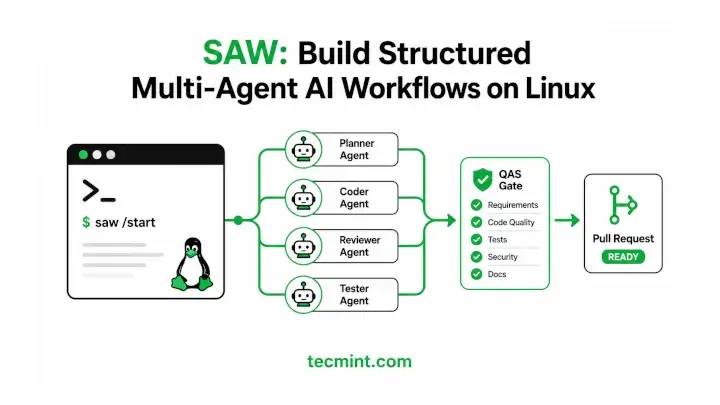
SAW, short for SAFe Agentic Workflow, is a structured workflow that works alongside Claude Code. Instead of relying on a single AI agent to handle everything, SAW divides the work into clearly defined roles. It does this by adding a collection of Claude Code slash commands, agent definitions, and hooks to your project’s .claude directory.
Each agent has a specific responsibility. For example, the BSA (Business Systems Analyst) creates the requirements and acceptance criteria, Developer agents implement the changes, the QAS (Quality Assurance Specialist) reviews and approves the work before it moves forward, and the RTE (Release Train Engineer) coordinates the overall workflow and pull request.
The biggest advantage of SAW is that it prevents agents from making assumptions. If a task doesn’t include clear acceptance criteria, the Developer agent won’t start working on it. Instead, it sends the task back to the BSA to clarify the requirements.
This simple approval gate helps keep everyone working toward the same goal and reduces unexpected changes.
For this guide, we tested SAW on Ubuntu 26.04 LTS and RHEL 10. However, because SAW mainly consists of shell scripts and Markdown files stored in your project’s repository, it can run on almost any modern Linux distribution as long as Git and Node.js are installed.
Reload Your Shell
If you’ve just updated your shell configuration, reload it so the changes take effect:
source ~/.bashrc
This command reloads your current shell session without requiring you to log out or open a new terminal window.
Prerequisites
Before you install SAW, make sure you have Git, Node.js, and Claude Code installed.
- Git is used to clone the SAW repository and manage your project.
- Node.js is required because SAW uses Node-based tools and scripts.
- Claude Code is the AI coding assistant that SAW is designed to work with.
Install Git and Build Tools on Ubuntu/Debian
sudo apt update
sudo apt install -y git curl build-essential
Install Git and Build Tools on RHEL/Rocky Linux
sudo dnf install -y git curl gcc make
The sudo command runs a command with administrator (root) privileges. Installing software writes files to system directories that a regular user cannot modify, so these commands require sudo.
If you receive a Permission denied error during installation, make sure you’re running the command with sudo.
Install NVM (Node Version Manager)
SAW specifies the Node.js version it expects in a file named .nvmrc. Instead of using the Node.js version provided by your Linux distribution, it’s better to install NVM (Node Version Manager).
NVM makes it easy to install and switch between different Node.js versions.
Install NVM with:
curl -o- https://raw.githubusercontent.com/nvm-sh/nvm/v0.40.1/install.sh | bash
After the installation finishes, reload your shell so the nvm command becomes available:
source ~/.bashrc
This command reloads your current shell configuration without requiring you to open a new terminal window.
If SAW’s automation has made your workflow easier, share this guide with a teammate who’s still copy-pasting AI-generated code by hand.
Step 1: Clone the SAW Repository
The first step is to clone the SAW repository. This creates a local copy that you’ll use to copy the required files into your own project. You won’t be developing directly inside this cloned directory.
Clone the repository and switch to it:
git clone https://github.com/bybren-llc/safe-agentic-workflow.git
cd safe-agentic-workflow
nvm install
nvm use
The nvm< install command reads the .nvmrc file in the repository and installs the required Node.js version if it isn’t already available on your system. The nvm use command then switches your current shell session to that version so SAW runs with the environment it was designed for.
Here’s what each command does:
git clonedownloads the complete SAW repository, including configuration folders such as.claude/,.gemini/,.codex/, and.cursor/for the supported AI providers.cd safe-agentic-workflowchanges your current directory to the cloned repository so the remaining commands run in the correct location.nvm installchecks the.nvmrcfile and installs the required Node.js version if it’s not already installed.nvm useswitches your current terminal session to use that Node.js version.
Step 2: Copy SAW into Your Project
SAW isn’t installed like a typical software package. Instead, you copy its configuration files into the project where you want to use it. If you’re using Claude Code, you’ll copy the .claude directory into your project’s root directory.
Run the following command:
cp -r .claude/ /path/to/your-project/.claude/
cd /path/to/your-project
Replace /path/to/your-project/ with the actual path to your project. Throughout this guide, placeholders enclosed in angle brackets, such as, represent values that you should replace with your own.
The first command copies the entire .claude directory, including the agent definitions, slash commands, and workflow files, into your project. The second command changes to your project’s directory so you can continue the setup from there.
If your team uses another supported AI coding assistant, you can copy the corresponding configuration directory instead. For example, copy .gemini/ for Gemini CLI or .cursor/ for Cursor using the same approach.
Step 3: Customize the Project Placeholders
The SAW templates include placeholder values such as {{TICKET_PREFIX}} and {{PROJECT_NAME}}. Before you start using the workflow, replace these placeholders with values that match your project.
Run the setup script:
bash scripts/setup-template.sh
The script will prompt you for a few details, including your project name and a ticket prefix. For example, if your issue tracker uses ticket IDs likeTEC-123, enter TEC as the ticket prefix.
After the script finishes, open the .claude/SETUP.md file and verify that all placeholders have been replaced. If you still see values such as {{TICKET_PREFIX}} or {{PROJECT_NAME}}, update them before continuing.
Leaving placeholder values in the configuration can cause agent prompts and handoff templates to contain incomplete or incorrect information later.
If you’ve ever seen an AI agent make up requirements because the original task wasn’t clear, you’ll appreciate why SAW exists. Its stop-the-line workflow forces missing requirements to be clarified before any code is written, helping keep every agent focused on the work you actually asked for.
If you found this guide helpful, share it with someone who wants more predictable and reliable AI-assisted development.
Step 4: Run Your First Ticket
After copying and configuring SAW, you’re ready to use it with Claude Code.
Start Claude Code from your project’s root directory:
claude
When the Claude Code session opens, start working on a ticket using the slash command provided by SAW:
/start-work TEC-123
Replace TEC-123 with the actual ticket ID from your project.
When you run this command, the BSA (Business Systems Analyst) agent starts first. Its job is to check whether the ticket includes clear acceptance criteria and a defined “Definition of Done.”
If either of these is missing, the workflow stops and asks you to add the required information before any implementation begins.
This behavior is intentional. Instead of letting an AI guess what needs to be done, SAW requires the task to be clearly defined first. This helps reduce mistakes and keeps the implementation aligned with the original requirements.
Once the ticket has complete acceptance criteria, the appropriate Developer agent begins implementing the changes. After finishing, it hands the work over with a “Ready for QAS” status.
The QAS (Quality Assurance Specialist) agent then reviews the implementation against the same acceptance criteria before the changes can move forward to a pull request.
This structured workflow helps ensure that every stage of the task is reviewed before it is considered complete.
If your team has ever shipped a fix that accidentally skipped testing, share this guide with your team lead before it happens again.
Key SAW Commands
As you work with SAW, you’ll mainly use the following slash commands to manage tickets and move them through the workflow.
| Command | Purpose |
|---|---|
/start-work TEC-123 |
Starts work on a ticket and checks that it has valid acceptance criteria and a Definition of Done (DoD) before implementation begins. |
/pre-pr |
Runs the required validation checks before creating or submitting a pull request. |
/end-work |
Ends the current work session and cleans up the workflow state. |
/check-workflow |
Shows the current status of a ticket and where it is in the SAW workflow. |
These commands provide a consistent way to start work, validate changes, track progress, and finish tasks without manually managing the workflow.
Running Agent Teams on a Remote Server
For longer or more complex projects, you can run SAW’s agent teams on a remote Linux server instead of your local machine. The dark-factory directory included with SAW is designed for this purpose.
It uses tmux to keep multiple agent sessions running in the background, even if you disconnect from the server.
This setup is useful for long-running tasks that may take hours to complete or when you don’t want to keep your laptop powered on throughout the process.
DigitalOcean offers cloud VPS plans starting at $4/month.
TecMint Pro members can also receive $200 in free credits to create their first server and follow along with this guide. We may earn a commission at no additional cost to you.
If you found SAW’s dark-factory tmux setup useful for running agents unattended, share this guide with others who are looking for a reliable way to keep AI agent workflows running on a remote Linux server without having to monitor a terminal continuously.
Common Mistake: Skipping the Manifest During Updates
A common mistake is updating SAW without using its manifest-based synchronization process. Older versions of SAW were typically updated by adding the repository as a Git remote and manually comparing changes with git diff.
While that approach still works in SAW v2.10.0, it doesn’t track which files you’ve customized. As a result, your local changes can be accidentally overwritten during an update.
Instead, initialize and use the manifest-based sync:
./scripts/sync-claude-harness.sh init
./scripts/sync-claude-harness.sh manifest init --yes
./scripts/sync-claude-harness.sh sync --version v2.10.0 --dry-run
Here’s what each command does:
./scripts/sync-claude-harness.sh initinitializes the synchronization environment../scripts/sync-claude-harness.sh manifest init --yescreates a manifest that records the managed files in your project../scripts/sync-claude-harness.sh sync --version v2.10.0 --dry-runpreviews the changes required to update to version v2.10.0 without modifying any files.
The --dry-run option is especially important because it shows exactly what will be updated before any changes are made. Review the output first, then rerun the sync command without --dry-run when you’re satisfied with the proposed changes.
What SAW Won’t Do for You
While SAW adds structure to AI-assisted development, it isn’t a complete project management solution or a replacement for good engineering practices.
According to the project’s documentation, SAW is primarily designed and tested for software development workflows. Support for other use cases, such as marketing, content creation, or research workflows, is available but hasn’t been validated as extensively in real-world production environments.
Similarly, SAW supports multiple AI coding assistants, including Claude Code, Gemini CLI, Codex CLI, and Cursor.
However, the Claude Code integration is currently the most mature and thoroughly tested. The integrations for Gemini CLI, Codex CLI, and Cursor are newer, so you may occasionally encounter limitations or need to make minor adjustments to fit your workflow.
If you’re using SAW with Claude Code for software development, you’re following the most established and well-tested path. If you’re using it for other domains or with newer integrations, be prepared to experiment and refine your setup as needed.
If this guide helped you set up a structured multi-agent workflow without building one from scratch, share it with your teammates or team lead so they can benefit from it too.
Conclusion
You’ve successfully set up SAW by cloning the repository, copying the required files into your project, replacing the default placeholders with your own project details, and running your first ticket through the workflow.
Along the way, you also saw how SAW’s stop-the-line check ensures that work doesn’t begin until a ticket has clear acceptance criteria, and how the QAS approval step helps verify changes before they move forward.
The real strength of SAW isn’t just using multiple AI agents, it’s giving each agent a well-defined role and requiring work to pass through structured review stages.
This helps keep development consistent, reduces unnecessary changes, and makes it easier to track the progress of every task.
To see where your current work stands, run:
/check-workflow
This command displays the current status of the workflow and shows which stage your ticket is in.
If this article helped, with someone on your team.
