

When you connect to a coffee shop’s WiFi or access the internet from any public network, your data travels through infrastructure you don’t control. Anyone positioned between you and the websites you visit could potentially intercept your traffic, even on your home network, your internet service provider can see every site you browse.
A VPN solves this by creating an encrypted tunnel between your device and a server you trust. Instead of your traffic going directly to the internet, it first travels through this secure tunnel to your VPN server, which then forwards it to its destination, so anyone watching the network, they only see encrypted data going to your VPN server, nothing more.
WireGuard is a modern VPN protocol that does this job remarkably well. Unlike older VPN technologies that require hundreds of thousands of lines of code, WireGuard accomplishes the same task with just about 4,000 lines, which means fewer bugs, better performance, and easier security audits.
But here’s the thing: while WireGuard itself is simple, managing multiple VPN clients, generating configuration files, and keeping track of who has access can become tedious through command-line alone, that why having a web interface comes in handy.
In this guide, we’ll set up a complete WireGuard VPN server with a friendly web interface that lets you manage everything through your browser such as adding new devices, generating QR codes for mobile clients and monitoring connections without touching a single configuration file manually.
What You’ll Need
Before we begin, make sure you have:
- A Linux server with a public IP address (a VPS from providers like DigitalOcean, Linode, or AWS works perfectly).
- Root access or sudo privileges on this server.
- A basic understanding of SSH (you should know how to connect to your server).
This guide assumes you’re running Ubuntu 22.04 or Ubuntu 24.04, but the steps work similarly on Debian and other distributions with minor adjustments.
Understanding the Architecture
Let’s take a moment to understand what we’re building before we start typing commands.
A WireGuard setup consists of peers – devices that can talk to each other through encrypted tunnels.
In our case, we’ll have:
- The Server: Your Linux machine with a public IP address, which acts as the central hub that all your devices connect to.
- The Clients: Your laptop, phone, tablet, or any other device you want to protect, each client gets its own cryptographic key pair and configuration.
- The Web Interface: A lightweight web application (we’ll use WireGuard-UI) that runs on your server and gives you a dashboard to manage everything.
When a client wants to connect, it establishes a direct encrypted tunnel to the server and then the server route the client’s internet traffic or simply allow access to resources on the server’s local network, depending on how you configure it.
Step 1: Installing WireGuard on Ubuntu Server
First, let’s make sure your system is up to date and has the necessary tools installed using the following command, which will update your package lists and upgrade any outdated software.
sudo apt update && sudo apt upgrade -y
Next, install WireGuard itself:
sudo apt install wireguard -y
Since WireGuard is built into the Linux kernel (for kernels 5.6 and above), this command primarily installs the userspace tools needed to configure and manage WireGuard interfaces.
Step 2: Enabling IP Forwarding on Ubuntu
By default, Ubuntu doesn’t forward packets between network interfaces, which is a security feature that your server won’t act as a router unless you explicitly tell it to, but for a VPN server, we need this functionality.
When your phone connects to the VPN and tries to visit a website, the server needs to forward that request from the WireGuard interface to its public network interface, and then forward the response back.
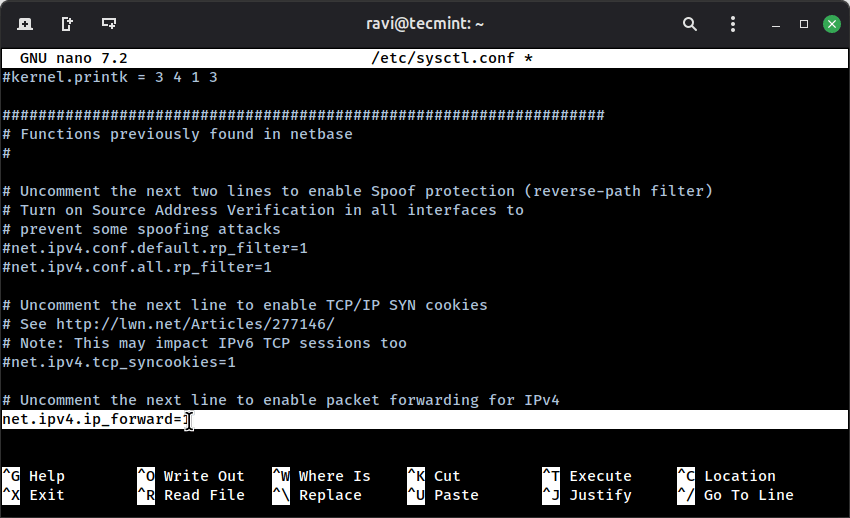
To enable IP forwarding permanently, we need to edit a system configuration file:
sudo nano /etc/sysctl.conf
Look for this line (it might be commented out with a # at the beginning):
#net.ipv4.ip_forward=1
Remove the # to uncomment it, or add the line if it doesn’t exist:
net.ipv4.ip_forward=1
Save the file and then apply change without rebooting:
sudo sysctl -p
Step 3: Configure Firewall and Routing for WireGuard
Your VPN server needs to accept incoming connections on the port WireGuard uses (by default, UDP port 51820). It also needs to properly route traffic between the VPN interface and your public network interface.
First, let’s identify your public network interface:
ip route | grep default
You’ll see output like:
default via 192.168.1.1 dev eth0 proto dhcp src 192.168.1.100 metric 100
The interface name here is `eth0`, but it may be different on your system, it could be `ens3`, `enp0s3`, or something similar.
Now let’s configure the ufw firewall (Ubuntu’s default firewall):
# Allow SSH (if you haven't already)
sudo ufw allow 22/tcp

# Allow WireGuard
sudo ufw allow 51820/udp

# Allow the web interface (we'll use port 5000)
sudo ufw allow 5000/tcp
Next, we need to add a NAT (Network Address Translation) rule that tells your server to masquerade VPN traffic as if it’s coming from the server itself when forwarding it to the internet.
sudo nano /etc/ufw/before.rules
Add these lines at the top of the file, right after the header comments, but before the *filter line and replace eth0 with your actual interface name:
# NAT table rules for WireGuard
*nat
:POSTROUTING ACCEPT [0:0]
-A POSTROUTING -s 10.0.0.0/24 -o eth0 -j MASQUERADE
COMMIT
Here’s what this means:
*nat: We’re working with the NAT table.-s 10.0.0.0/24: For packets coming from our VPN network (10.0.0.0/24 is the subnet we’ll assign to VPN clients).-o eth0: Going out through the eth0 interface.-j MASQUERADE: Rewrite the source IP to be the server’s public IP.
Save and exit, then enable and reload UFW:
sudo ufw enable
sudo ufw reload
Step 4: Installing WireGuard-UI on Ubuntu Server
Now comes the interesting part, setting up the web interface using WireGuard-UI, which is a clean and simple web application written in Go.
First, create a directory for WireGuard-UI:
sudo mkdir -p /opt/wireguard-ui
cd /opt/wireguard-ui
Next, download the latest release of WireGuard-UI from the GitHub releases page, but at the time of writing, wget command gets a recent stable version:
sudo wget https://github.com/ngoduykhanh/wireguard-ui/releases/download/v0.6.2/wireguard-ui-v0.6.2-linux-amd64.tar.gz
Once downloaded, extract it and make it executable:
sudo tar -xzf wireguard-ui-v0.6.2-linux-amd64.tar.gz
sudo chmod +x wireguard-ui
Before we start the interface, let’s create a systemd service so it runs automatically on boot.
sudo nano /etc/systemd/system/wireguard-ui.service
Paste this configuration:
[Unit]
Description=WireGuard UI
After=network.target

[Service]
Type=simple
WorkingDirectory=/opt/wireguard-ui
ExecStart=/opt/wireguard-ui/wireguard-ui
Restart=always
RestartSec=10

[Install]
WantedBy=multi-user.target
Save and exit, then enable and start the service:
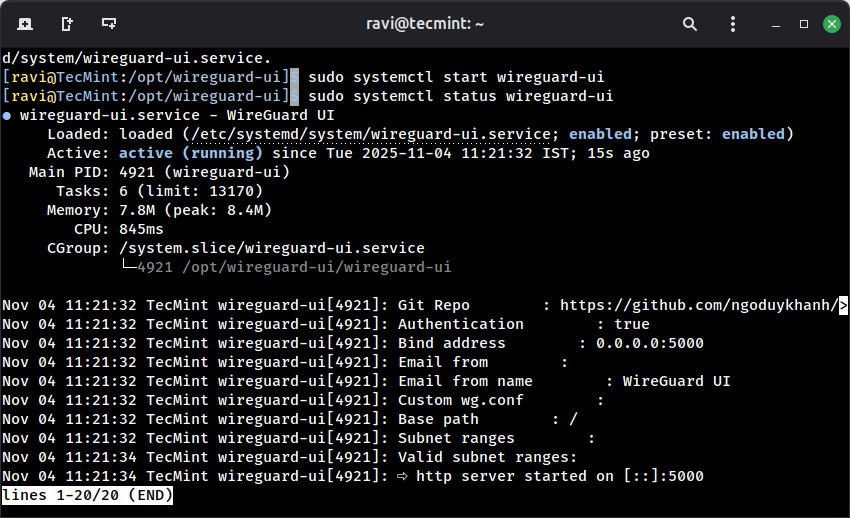
sudo systemctl daemon-reload
sudo systemctl enable wireguard-ui
sudo systemctl start wireguard-ui
Check that it’s running:
sudo systemctl status wireguard-ui
Step 5: Accessing the Wireguard-UI
Open your web browser and navigate to the following URL, make sure to replace YOUR_SERVER_IP with your server’s actual public IP address.
http://YOUR_SERVER_IP:5000
You’ll see a login page, where you can use the following default credentials:
Username: admin
Password: admin
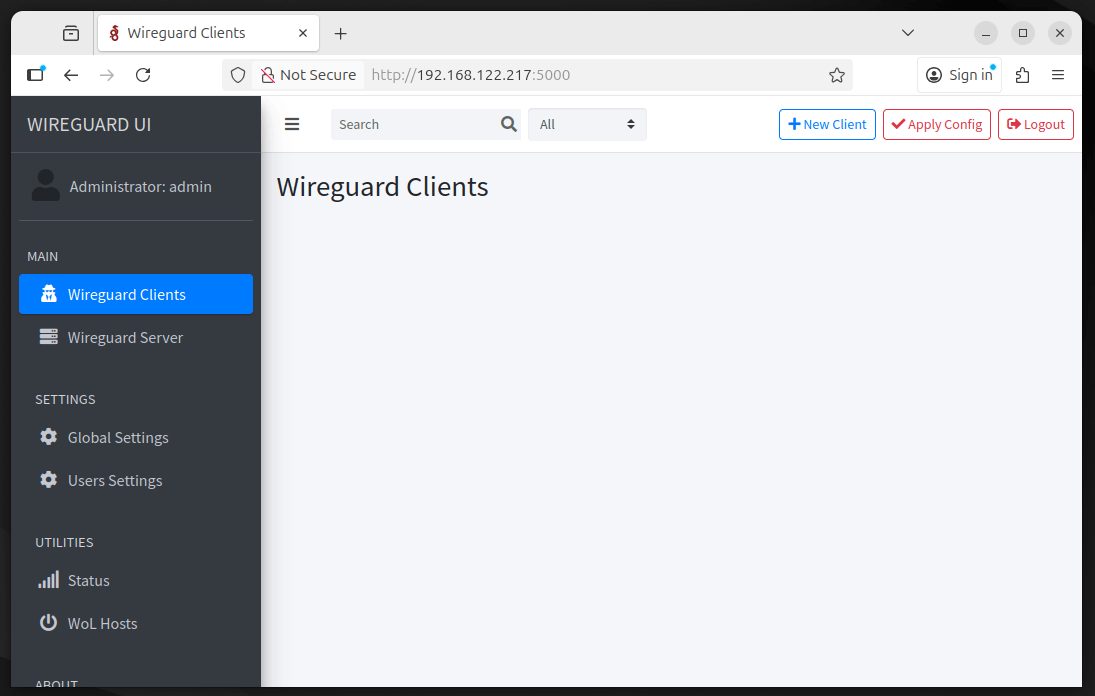
Important: Change these immediately after logging in. Click on your username in the top right, then “Settings,” and update your password.
Step 6: Configuring Your WireGuard Server
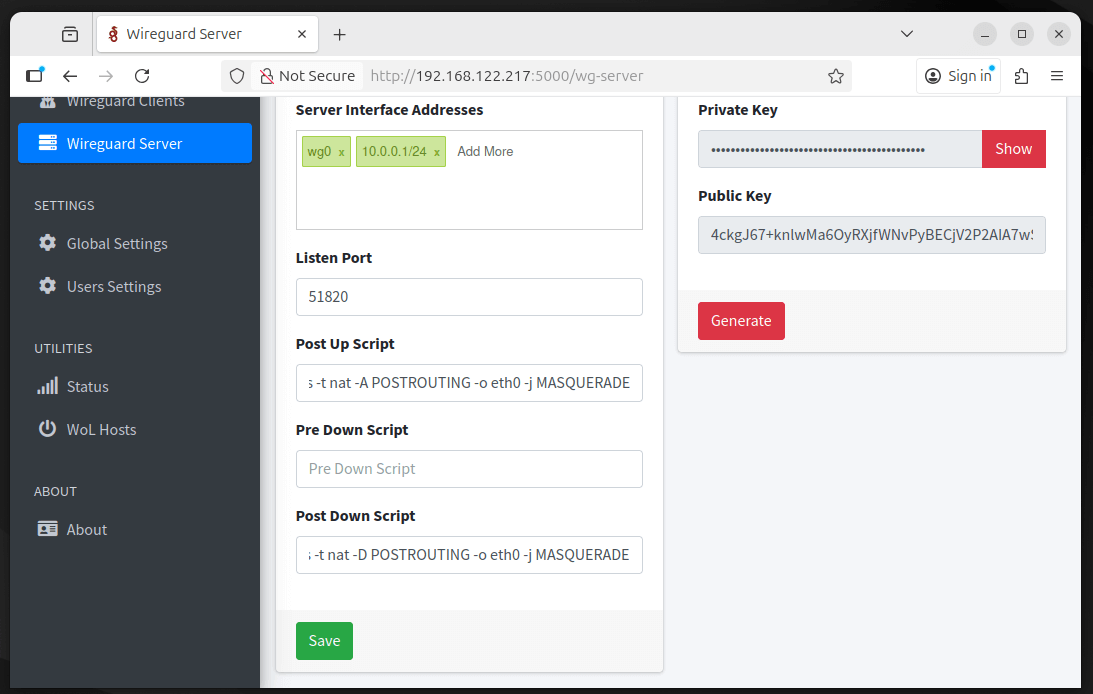
Once you’re logged in, you’ll be taken to the WireGuard-UI dashboard. To begin configuring your server, click on “WireGuard Server” in the left sidebar and set the Interface Name to 10.0.0.1/24 (the default WireGuard interface), and the Listen Port to 51820.
In the Post Up Script field, enter:
iptables -A FORWARD -i wg0 -j ACCEPT; iptables -t nat -A POSTROUTING -o eth0 -j MASQUERADE
and in the Post Down Script field, enter:
iptables -D FORWARD -i wg0 -j ACCEPT; iptables -t nat -D POSTROUTING -o eth0 -j MASQUERADE
Be sure to replace eth0 with your actual network interface name if it’s different and set the Address to 10.0.0.1/24, which will be the server’s internal VPN IP address.
When you click Apply Config, WireGuard will create the wg0 interface, listen for VPN connections on port 51820, assign your server its VPN IP, and configure firewall rules to properly forward VPN traffic.
The UI will also generate your server’s private and public keys automatically. After applying the settings, the interface should show as Active, indicating that your WireGuard server is up and running.
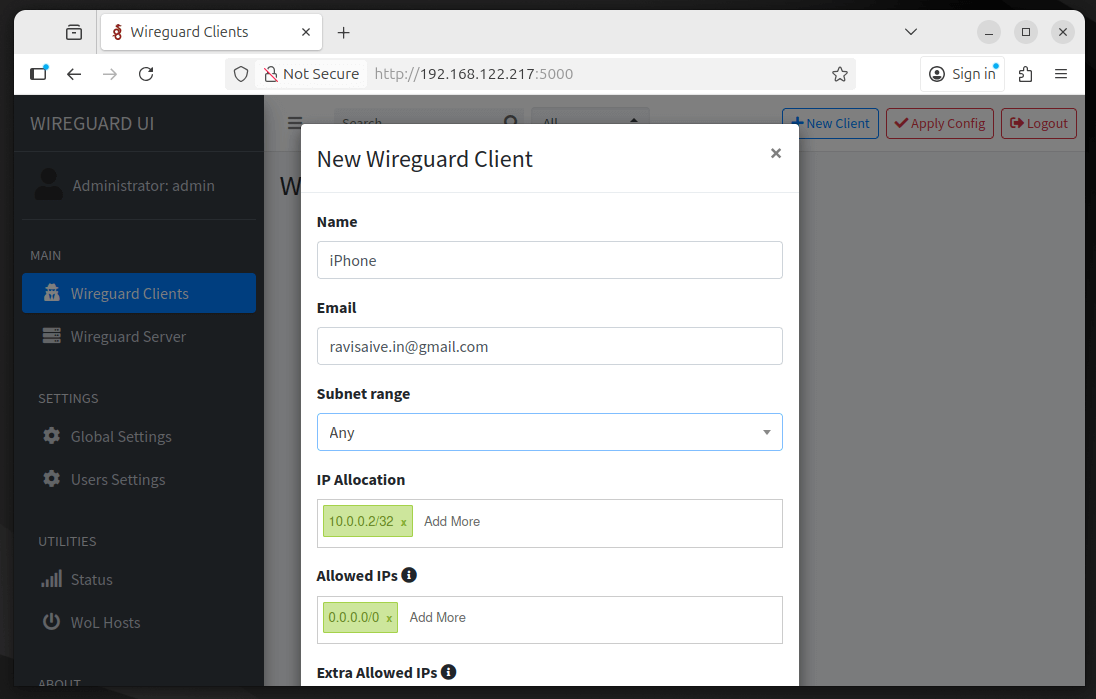
Step 7: Add Your First WireGuard Client
Now let’s add a device to your VPN, which could be your laptop, phone, or any other client device. From the left sidebar, click “Clients”, then click “Add New Client.”
Give the client a descriptive name such as “My Laptop” or “iPhone”, and optionally enter an email to help identify the device later. Click “Auto” to automatically assign the next available IP address (likely 10.0.0.2).
For Allowed IPs, enter 0.0.0.0/0, ::/0, which ensures that all of the client’s traffic is routed through the VPN; if you only want access to the server’s internal network, you could instead specify that subnet (for example, 10.0.0.0/24).
Once everything is set, click “Submit” and the web interface will automatically generate a complete WireGuard configuration for this client, including its own cryptographic key pair.
Step 8: Connecting Your Client Device
Now you need to get the configuration onto your device and WireGuard-UI makes this easy with QR codes for mobile devices and downloadable configuration files for computers.
For Mobile Devices (Phone/Tablet):
- Install the WireGuard app from your app store (it’s available for both iOS and Android).
- In the WireGuard-UI web interface, find your newly created client and click the QR code icon.
- Open the WireGuard app on your phone, tap the
"+"button, and select “Create from QR code“. - Scan the QR code displayed in your browser.
- Give your connection a name and tap “Create Tunnel“.
That’s it! Toggle the switch to connect, and your mobile device is now routing all its traffic through your VPN server.
For Desktop/Laptop:
- Install WireGuard from wireguard.com/install.
- In the WireGuard-UI interface, click the download icon next to your client to download the
.conffile. - Open the WireGuard application on your computer, click “Import tunnel(s) from file“, and select the downloaded configuration file.
- Click “Activate” to connect.
Step 9: Testing Your VPN
Let’s make sure everything is working properly. First, while your VPN is disconnected, visit whatismyipaddress.com and take note of the IP address shown.
Then, connect to your WireGuard VPN and refresh the page, your IP address should now display your server’s public IP instead of your original one, confirming that traffic is being routed through the VPN.
To further verify that DNS is functioning correctly, you can run the following command on your connected device:
ping google.com
If you see responses, your VPN is routing traffic correctly.
To see active connections on your server, SSH in and run:
sudo wg show
You’ll see output like:
interface: wg0
  public key: [your server's public key]
  private key: (hidden)
  listening port: 51820

peer: [client's public key]
  endpoint: [client's IP]:random_port
  allowed ips: 10.0.0.2/32
  latest handshake: 45 seconds ago
  transfer: 2.50 MiB received, 15.23 MiB sent
This shows your client is connected, when it last communicated with the server, and how much data has been transferred.
Step 10: Use HTTPS for WireGuard-UI
Right now, when you access your WireGuard web interface at http://YOUR_SERVER_IP:5000, your login credentials and all configuration data travel across the internet in plain text and anyone intercepting the traffic between your browser and the server could see your admin password and potentially hijack your session.
The solution is to put your web interface behind a reverse proxy with HTTPS enabled and a reverse proxy sits in front of your application, handles all the encrypted HTTPS connections from clients, and then forwards the requests to your application over the local network where interception isn’t a concern.
We’ll use Nginx (high-performance web server) as our reverse proxy and Let’s Encrypt to get a free SSL certificate so that you’ll access your WireGuard interface at https://vpn.yourdomain.com instead of an IP address with HTTP.
Install Nginx Web Server
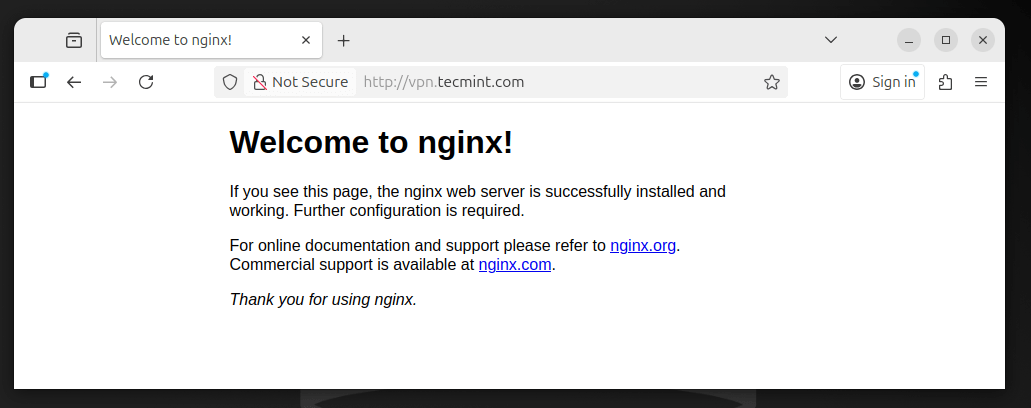
First, you need to create a DNS record for your domain (https://vpn.yourdomain.com) that points to your server’s IP address and then install Nginx web server.
sudo apt update
sudo apt install nginx -y
After installation, you can visit http://vpn.yourdomain.com in your browser and you’ll see the default Nginx welcome page, which means Nginx is working and accessible from the internet.
Install Certbot for Let’s Encrypt
Next, install Let’s Encrypt, which is a free certificate authority that provides SSL certificates and certbot is a tool that automates the process of obtaining and renewing these certificates.
sudo apt install certbot python3-certbot-nginx -y
The python3-certbot-nginx package includes a plugin that can automatically configure Nginx for you, making the process much simpler.
Configure Nginx as a Reverse Proxy
Now, let’s create an Nginx configuration that forwards requests from https://vpn.yourdomain.com to your WireGuard-UI application running on localhost:5000.
Create a new configuration file.
sudo nano /etc/nginx/sites-available/wireguard-ui
Paste this configuration (replace vpn.yourdomain.com with your actual domain):
server {
    listen 80;
    listen [::]:80;
    server_name vpn.yourdomain.com;

    # This will be used by Certbot for the SSL certificate challenge
    location /.well-known/acme-challenge/ {
        root /var/www/html;
    }

    # Redirect all other HTTP traffic to HTTPS
    location / {
        return 301 https://$host$request_uri;
    }
}

server {
    listen 443 ssl http2;
    listen [::]:443 ssl http2;
    server_name vpn.yourdomain.com;

    # SSL certificate paths (Certbot will fill these in)
    ssl_certificate /etc/letsencrypt/live/vpn.yourdomain.com/fullchain.pem;
    ssl_certificate_key /etc/letsencrypt/live/vpn.yourdomain.com/privkey.pem;

    # Modern SSL configuration
    ssl_protocols TLSv1.2 TLSv1.3;
    ssl_ciphers HIGH:!aNULL:!MD5;
    ssl_prefer_server_ciphers on;

    # Security headers
    add_header Strict-Transport-Security "max-age=31536000; includeSubDomains" always;
    add_header X-Frame-Options "SAMEORIGIN" always;
    add_header X-Content-Type-Options "nosniff" always;

    # Proxy settings
    location / {
        proxy_pass http://127.0.0.1:5000;
        proxy_http_version 1.1;

        # WebSocket support (if WireGuard-UI uses it)
        proxy_set_header Upgrade $http_upgrade;
        proxy_set_header Connection "upgrade";

        # Forward real client information
        proxy_set_header Host $host;
        proxy_set_header X-Real-IP $remote_addr;
        proxy_set_header X-Forwarded-For $proxy_add_x_forwarded_for;
        proxy_set_header X-Forwarded-Proto $scheme;

        # Timeouts
        proxy_connect_timeout 60s;
        proxy_send_timeout 60s;
        proxy_read_timeout 60s;
    }
}
Now enable this configuration by creating a symbolic link:
sudo ln -s /etc/nginx/sites-available/wireguard-ui /etc/nginx/sites-enabled/
Test your Nginx configuration for syntax errors:
sudo nginx -t
You should see:
nginx: the configuration file /etc/nginx/nginx.conf syntax is ok
nginx: configuration file /etc/nginx/nginx.conf test is successful
If you see any errors, go back and check your configuration file for typos.
Obtain an SSL Certificate
Once everything is configured correctly, it is now time to run certbot command that will automatically obtain an SSL certificate from Let’s Encrypt and configure Nginx to use it.
sudo certbot --nginx -d vpn.yourdomain.com
The entire process takes about 30 seconds, and when it’s done, you’ll see a success message:
Successfully received certificate.
Certificate is saved at: /etc/letsencrypt/live/vpn.yourdomain.com/fullchain.pem
Key is saved at: /etc/letsencrypt/live/vpn.yourdomain.com/privkey.pem
Now reload Nginx to apply everything:
sudo systemctl reload nginx
Certificate Auto-Renewal
Let’s Encrypt certificates are only valid for 90 days, which is intentional to encourage regular renewal and limit potential damage if a private key is ever compromised.
Fortunately, Certbot automatically sets up a renewal timer when installed, and you can confirm that the renewal service is active by running:
sudo systemctl status certbot.timer
and you should see it listed as active (running), this timer checks twice daily and will automatically renew any certificate that is within 30 days of expiring.
To verify that everything is working without performing an actual renewal, run:
sudo certbot renew –dry-run
If the test completes successfully, your automatic certificate renewal is fully configured, and you won’t need to worry about your certificates expiring.
Update Your Firewall
Since we’re now accessing WireGuard-UI through Nginx on the standard HTTPS port (443), we need to allow this in our firewall and can optionally close direct access to port 5000.
sudo ufw allow 443/tcp
Optionally, if you want to prevent direct access to WireGuard-UI on port 5000 (forcing everyone to use the HTTPS interface), you can remove that rule:
sudo ufw delete allow 5000/tcp
Reload the firewall:
sudo ufw reload
Step 11: Configure WireGuard-UI to Listen Only on Localhost
Since Nginx is now handling all external connections, we should configure WireGuard-UI to only accept connections from the local machine, which prevents anyone from accessing it directly on port 5000, even if they discover the port is open.
Stop the WireGuard-UI service:
sudo systemctl stop wireguard-ui
Edit the service file:
sudo nano /etc/systemd/system/wireguard-ui.service
Modify the ExecStart line to bind only to localhost:
[Unit]
Description=WireGuard UI
After=network.target

[Service]
Type=simple
WorkingDirectory=/opt/wireguard-ui
Environment="BIND_ADDRESS=127.0.0.1:5000"
ExecStart=/opt/wireguard-ui/wireguard-ui
Restart=always
RestartSec=10

[Install]
WantedBy=multi-user.target
Save and exit, then reload systemd and restart the service:
sudo systemctl daemon-reload
sudo systemctl start wireguard-ui
sudo systemctl status wireguard-ui
Finally, open your browser and navigate to:
https://vpn.yourdomain.com
You should see a padlock icon in your browser’s address bar, you can click the padlock icon to view the certificate details. You’ll see it was issued by Let’s Encrypt and is valid for 90 days.
Summary
By now, you’ve successfully deployed a fully operational WireGuard VPN server with a secure web-based management interface. Instead of manually handling keys, configuration files, and routing rules, WireGuard-UI gives you a simple dashboard to add new devices, generate QR codes, and monitor active connections.